Thursday

Surprise, I'm 85!

 I don't believe it myself but it was unavoidable that I get here sometime. As people keep reminding me, the alternative is much worse. Thanks a lot!

If you're wondering if I'm still cooking, the answer is yes. What's more, now that I have moved to a seniors residence, I am teaching breadmaking classes to my fellow residents.

This is not just a matter of pulling out a recipe! A lot of preparation is involved. For one thing they're all beginners so I have to test recipes so that they are beginner friendly. Can you believe that I have not yet found one for cinnamon buns? After four tests I have decided that the next class is going to be pita bread instead!

I can't wait to see the satisfaction on their faces when they find that their discs of dough have puffed up in the oven. That is quite magical and I never get tired of it. 

Food Processor Hamburger Buns


Given that flour costs a dollar a pound - or less - why do those horrible industrial hamburger buns, which are nothing but flour and air, cost so much?

Here is my latest favourite recipe. It has everything I want: the size is just right, the texture is light, and the taste is bland, so as not to overcome what's inside.

And last but not least, the quantity is just right for kneading in my rather small and not very powerful Hamilton Beach food processor.

The recipe is adapted from Paul Hollywood's Floury Baps recipe.

INGREDIENTS

375 g unbleached, all-purpose flour

2-1/4 tsp instant yeast

1-1/4 tsp salt

30 g sugar

30 g butter, cut into smallish cubes

250 ml (1 cup) cold water

INSTRUCTIONS

Place dry ingredients into food processor bowl fitted with the metal blade, and process a few seconds to mix. 

Add butter, process to small crumbs.

Pour water (cold!) through feed tube while running, then continue mixing until all is mixed and a cohesive ball forms around the blade.

Transfer to counter, knead a minute or two until nice and smooth.

Transfer to lightly oiled bowl, cover and leave an hour or so, until double in bulk.

Transfer to counter, cut into 8 pieces and shape each into a ball.

Move the balls to a floured surface and leave 10 minutes, to relax the dough.

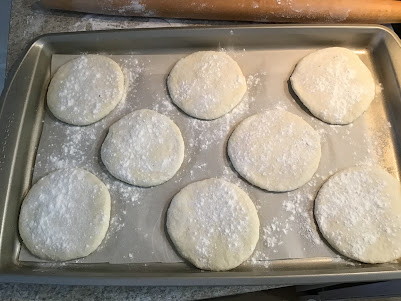
One ball at a time, flatten with rolling pin on a floured surface, and transfer to a baking sheet covered with parchment.


Turn oven on to 220 C or 450 F, with the rack in the middle.

Sprinkle with flour, cover and leave about 45 minutes, or until about double in size.

Bake 10 minutes, turn pan around, and bake 5 to 10 minutes more, until nice and brown. If you have a thermometer, it should register 205-210 degrees C.

Cool in pan for 5 minutes, then transfer to a rack to finish cooling.

Sunday

Nostalgia


This is the only brand of long macaroni you can buy here in Eastern Canada!

When I make macaroni and cheese I always use long macaroni. I hope it never disappears from the shelves because for some reason it tastes much better than those silly little elbows.

I learned to make my macaroni this way back in the 'Sixties - yes, that's the 1960s, nearly 60 years ago, when I was working as a translator at the head office of Robin Hood Flour Mills here in Montreal. It was located in the Town of Mount Royal Shopping Centre, and there was only one place to eat lunch and that was Murray's Restaurant, right in the little strip mall.

My recent web searches have shown that most people remember the Murray's chain - they had several branches in this part of the country - for their British desserts, but for me it was the rest of the menu that kept me standing in line to get in day after weekday in spite of the high prices. 

The macaroni and cheese was my absolute favourite, but their cheeseburger was the best in town, their mixed salad with "French" dressing was crunchy and fresh and loaded with veggies, and the vegetable soup was a classic. 

The only way I deviate from Murray's macaroni and cheese is that I sometimes pour it into a baking dish, slice some tomatoes on top, dot with butter and bake until the top begins to turn brown in places. But it's delicious straight out of the pot too.

I have no recipe: I just make a béchamel, add lots of yellow aged cheddar cheese and a pinch of Cayenne pepper and stir this into the cooked macaroni. The secret is to keep the sauce silky by not cooking it after you add the cheese.

As for those desserts, the ones people keep remembering are the Steamed Fruit Pudding with Custard Sauce and the Rice Custard Pudding and I must say both were absolutely top-notch.

To find the recipes, I just googled "Murray's steamed fruit pudding" and there they were.

Bon appétit!

Thursday

Make Your Own White Flour


NOTE: THIS IS BEING WRITTEN IN EARLY APRIL 2020, DURING THE CORONAVIRUS PANDEMIC.

It's not fair! Some of us have been making our own bread forever, but now all those amateur newbie breadbakers are hoarding all the flour!

Every time I place an online food order, it arrives minus the flour I ordered.

Except for my last order. There it was: a 5-lb bag of whole wheat flour.

But sometimes you really really need white flour, so Im making my own until better times.

You see, whole wheat flour is just white all-purpose flour with some bran added. (Honest, unless you grind your own wheat berries, there is no wheat germ in your "whole" wheat flour.) So all you have to do is sift the bran out of your whole wheat flour.

Last night, I made the above test. I already knew about sifting the bran out; the test was about making my own sieve out of cheesecloth and an embroidery hoop, because my fine flour sifter seems to have disappeared during my recent move.

As you can see, there is a substantial amount of bran in whole wheat flour. Save it for another use.

Another solution to render the bran less gluten-destroying is to run the flour, or just the bran, through the food processor. At times I've separated it out, as in the photo, and ground it in my spice grinder.

You've got time, these days, so experiment!

Happy Baking!


Wednesday

Why I Will Never Be A Vegetarian

There are two reasons why I will never be a vegetarian: carnitas and barbacoa. Yes, both are Mexican meat dishes!  

Carnitas is Mexico's favourite way of eating pork and barbacoa is how you eat lamb if you live in Mexico.

Homemade Carnitas. Photo credit: Mexico In My Kitchen
Real barbacoa cannot be made at home, but an excellent carnitas substitute is entirely feasible, and you will find the recipe here: https://www.mexicoinmykitchen.com/pork-carnitas-mexican/

Please ignore any recipe that contains anything else - trust me, this is the real mccoy.  In fact, having lived in Mexico for over 20 years, I can assure you that all Mely's recipes are absolutely what you would be served if you had the good fortune of having friends like mine in Mexico. If you like authentic Mexican food, you should subscribe to her blog (it's in English).

Homemade Mixiotes
As for barbacoa, I'm sorry that she does not give a recipe for my favourite alternative, mixiotes. They are little parcels of lamb and seasoning in parchment paper tied with string that are steamed for a couple of hours. You can make a decent substitute as long as you have access to latino ingredients like dried chiles.

Here is a recipe that I might use: https://www.tvazteca.com/aztecauno/cocineros-mexicanos/recetas/notas/receta-mixiotes-de-borrego

I have not found one in English that I would recommend, so if you want to try this, write me in the Comments section and I will provide a translation.

Buen provecho!


Monday

Tomato Paste Trick

I used to buy small cans of tomato paste, but I would take out a tablespoon or two, and after a while the leftover paste would grow some fur, and I had to throw it out.

Then, one day, I discovered tomato paste in a tube, imported from Italy. I remember it well, it was at Eatalia in New York City. The huge, wonderful store was near the Yotel (this is not a typo, it's the name of the hotel!) where I was staying. I bought two tubes.

Nowadays, tube tomato paste is easy to find up here in Canada, even in the small town where I live, but my frugal self refuses to pay the price. So what I do is buy a larger can, and do this. I use a small ice cream scoop. I freeze the lot and store it in a baggie. Then I take out a ball or two when I need them.


Tuesday

The Best Multigrain Bread, Made Entirely By Hand


The previous post (https://the-cooks-corner-blog.blogspot.com/2019/06/100-grain-multigrain-sandwich-loaf-by.html) is a couple of years old, and during that time I have been working on perfecting my multigrain bread recipe. I wanted to achieve a result that tasted great, of course, but it had to use the ingredients that I have easy access to and that uses the equipment I have - or rather the lack of it.

I thought I had finally figured it all out, then this week I had a contretemps, and it resulted in yet another positive development. (See Notes at the end.)

I hesitated a long time before publishing my recipe -- there is no copyright on recipes -- but at this stage of my life, I would be totally flattered if someone were to steal it! Please note that this is not a recipe for beginners.

THE MORNING BEFORE, make the POOLISH

170 g unbleached all-purpose flour
1/2 tsp instant yeast

Add
170 g water (cold, cool, lukewarm, makes no difference)

Mix well. Cover and leave at room temperature overnight. I leave mine 24 hours. Refrigerate after 24 hours if not ready to bake.

At the same time, prepare the SOAKER

130 g 12-grain cereal (I buy mine at Bulk Barn)
25 g raw sunflower seeds
1/4 tsp salt
220 g water (any temp., as above)

Mix and let stand at room temperature alongside the Poolish. I stir mine from time to time because the sunflower seeds tend to float on top. Probably makes no difference.

Refrigerate after 24 hours if not ready to bake.

FINAL DOUGH

Combine the Poolish with the Soaker and add

120 g water
3 TB canola or other plain oil
45 g sweetener (agave syrup, honey, malt syrup, molasses) - I prefer molasses (2.5 TB)

In a separate bowl:

500 g whole wheat all-purpose flour
2 tsp instant yeast
2.5 tsp ordinary salt

1. I combine the two mixtures, mix well with the hands, and set aside 30 minutes. (This 30-minute wait is what has changed my whole way of making bread. It takes the place of most of the kneading!)
2. Turn onto very lightly floured counter and knead a few minutes. I can tell when it's ready when the surface tension is such that the sunflower seeds start to pop out. It's that simple!
3. Shape into a ball and place in a big bowl. Cover and leave 45 minutes. (Please see my note at the end about this.)
4. Turn out of bowl, give one full turn (pull one side and fold it in half, give a quarter turn and repeat, do this twice more) and immediately shape into 3 equal size balls (I use my scale for this), place them on parchment paper, cover with plastic and let them relax for 5 minutes. (If you don't know how to shape dough into balls, google it, just don't make them tight as the actual shaping will take place after the 5-minute wait.)
5. Prepare your couche. (If in doubt, see my Ciabatta post [https://the-cooks-corner-blog.blogspot.com/2018/10/the-best-and-lightest-ciabatta-bread.html], except the flour needs to be all over the linen, and not so thick.)
6. Shape into three bâtards (look it up if need be) and place in couche, close together but separated by a fold of linen. Cover with leftover couche and plastic.
7. Turn on oven at 450 F with baking stone on the middle shelf. Fill a spray bottle with water.
8. When the loaves are sufficiently puffed - not doubled in size, just nice and puffy - transfer them to a sheet of parchment placed on a peel by flipping them upside-down (gently!).
9. Slash them - I like one long slash, and I use a regular knife sharpened on the steel just before.
10. Slip onto stone and spray (I do 20 pumps of my small spray bottle). Repeat every minute - 3 times in all then turn oven down to 425 F.
11. Bake 20 minutes, turn all the loaves around and bake until nice and brown with an internal temperature of at least 200 degrees F.
12. Cool on a rack. If you can wait until the loaves are cool before tasting, you will be rewarded!

NOTES
A. If baking in bread pans, you don't need the stone, and you don't spray with water. Also you could reduce the oven temperature.
B. Of course you can make small rolls, long baguettes etc. Try it!
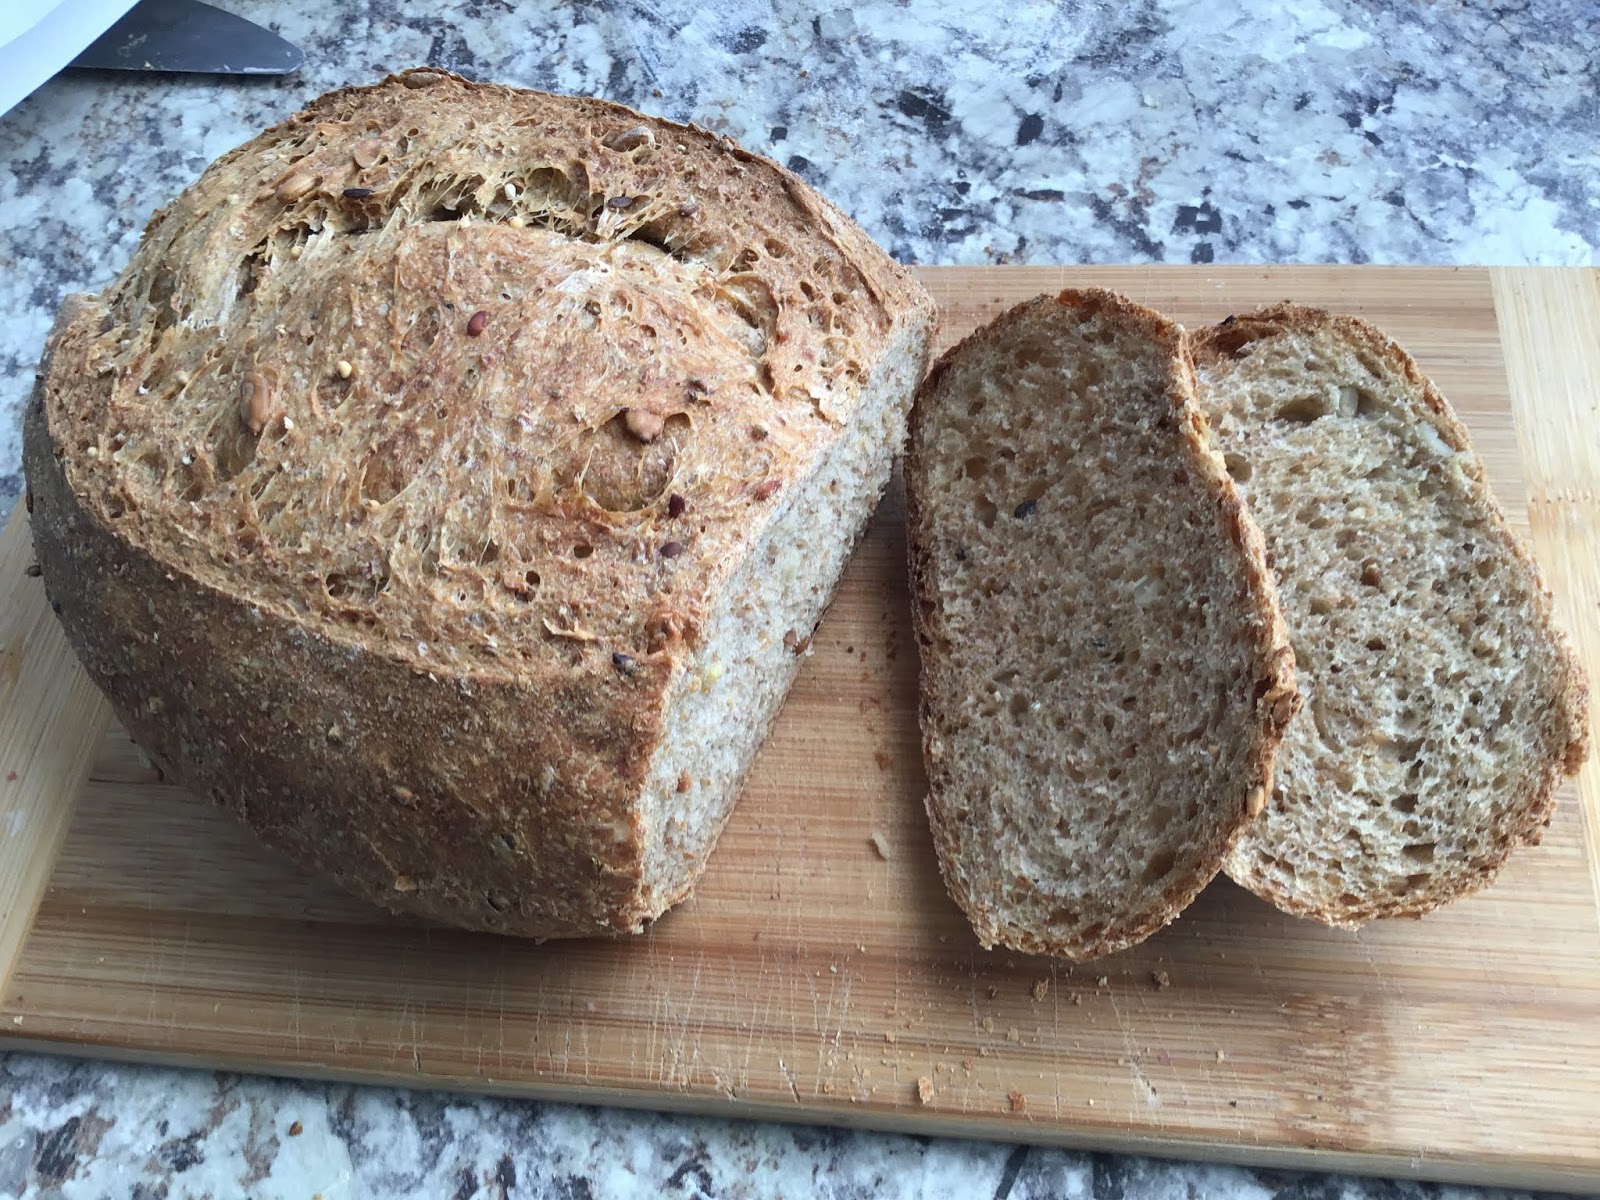
C. With reference to No. 3 above, I had an interesting experience today. The loaves in the photo are the result of it. I was planning on baking the loaves yesterday, but I had to go out so the Poolish and Soaker ended up on the kitchen counter all day, which I felt was long enough so instead of refrigerating them again I put the dough together up to No. 3 and put the whole thing in the fridge overnight. When I got up, the dough had filled the huge bowl and I was a bit worried about that extra rise. However, I proceeded as per No. 4 and, well, the result is these two photos. What you can't see is how light this bread is considering that it is mostly whole grains -- I may end up doing this every time!
D. I keep forgetting to slash a bit off the centre, so I mostly get loaves that are a bit lopsided, like the ones above.




Sunday

100% Grain Multigrain Sandwich Loaf By Hand? You Bet!

After that sad second experiment with the food processor last week - where cleaning time sort of cancelled out the time saved in kneading, and watching Michael Kalanty's course on Craftsy/Bluprint - and after my happy result making ciabatta rolls by hand, I decided to tackle the Serious Eats recipe I had made last week. Apart from the mess, it was a success and the recipe is one that you can start and finish on the same day.

This is what's left of it:

Serious Eats recipe made in food processor

The author, Stella Parks, warns that no other method but the food processor will produce the right results with her recipe, but I was willing to waste a pound of flour and half a cup of grains to test her theory. And I would get further practise in the art of breadmaking à l'ancienne.

I made the same substitutions to the recipe as I did last week - using 12-grain cereal from Bulk Barn instead of the individual grains on her list. Rested grains and flour for 2.5 hours after adding water to them.

That's when I veered away from the recipe. First I mixed the additional liquid, the yeast, sugar and oil together in a large bowl, added them to the wet flour by squishing them between the fingers à la Michael Kalanty. Then I added the salt and the soaked grains and continued squishing and mixing inside the bowl (wetting the fingers now and then) until all was blended, then I turned the dough onto the wet counter and did some slapping and smearing for a while.

I put the dough back in the bowl and let it rest about 20 minutes, then I gave it two turns, every 20 minutes or so, at which point I gave it the windowpane test and... surprise, it passed!

Back in the bowl for the required two hours. Shaped into a loaf and set the timer for 30 minutes and went away. When the timer went off, to my surprise the dough had already over-risen and the oven was still not on... and that's why the dome collapsed - as is obvious in the photo - but otherwise I would say the experiment was a success - wouldn't you?

Serious Eats recipe made entirely by hand
This bread is good and it works well as a sandwich loaf. But I need a deeper flavour, so next I need to tackle a slightly more complex loaf - one made with a poolish that has been fermenting overnight.

Stay tuned!

Friday

Ciabatta By Hand? Yes!

If and until I replace my KitchenAid mixer and/or spring for a better food processor, I'm pretty well stuck making bread by hand and today I made this batch of my own ciabatta recipe and frankly I can't tell the difference.


I used the method proposed by Michael Kalanty in the Craftsy class that I purchased years ago before they changed their name to Bluprint and made you subscribe instead of selling individual courses. (Luckily I had quite a few in my library and they're there "forever" for me to go back to.)

The class I'm referring to is "Secrets of Whole Grain Bread Baking" - nothing to do with white ciabatta, but bread is bread! I learned a lot from Mr. Kalanty, and it is mostly this: don't be afraid to handle your dough - even if it's super wet like this ciabatta!

Basically you mix your poolish and leave it overnight (check!), then you add the water and the flour and mix by hand (check!), then you rest and "develop" (that's bakerspeak for "knead") by hand in two stages, a total of only six minutes.

I know this dough so well that I was able to feel when it was ready to set aside and then to split into rolls and then to bake, so I couldn't give details even if I wanted.

Next I will make his "Seeded bâtard" which is a 100% whole wheat with seeds (I'm using 10-grain cereal instead because that's what I have and I'm adding extra sunflower seeds). I will make it freeform the first time (or in my oval banneton), but what I'd really like would be a sandwich bread baked in a pan that I could make regularly as my more healthy bread. At least until I can find a source of grains with reasonable prices so that I can start baking that wonderful Danish rye bread I posted here last year. I miss it so much!


Sunday

Kneading Bread Dough in the Food Processor

Google this and you'll find all sorts of links, but the most important one -- based on Charles Van Over's recipe from his book Best Bread Ever -- has just been deleted. It's important because it describes the process very thoroughly.

When I sold my house last December and decided to move a thousand miles away, I got rid of all my aging appliances and my big KitchenAid mixer was one of them. (Talk about something keeping its value -- I advertised it for $250 and my inbox immediately filled with buyers!)

Before springing for a new one, I thought I'd try to make all my breads without it. First I wanted to try kneading in the food processor. The ciabatta is going to be my first experiment.

Meanwhile, to perfect the technique I made a loaf of the Van Over bread. I followed the recipe exactly. I won't publish it here -- I suspect the publisher complained about copyright infringement --, but I did order the book and even though it's out of print you can get a used copy very cheaply, or your Library may have it.

It's a very simple recipe, makes a decent bread with a nice open texture in spite of a mere 45 seconds of kneading. Here is my loaf:


I shaped it in my oval banneton.

It looks good but flavour-wise, I would certainly not describe it as the "best bread ever" as it lack the depth that I am accustomed to in my white breads. A sort of slightly sour taste, like a mild sourdough.

Also it didn't keep very well; it dried very quickly in spite of being stored in plastic.

But I'm still glad I ordered the book because there are other recipes in there that I might want to play with.

As for the ciabatta, the starter is bubbling nicely as I write this, and tomorrow I'll let you know how it worked out. (I read somewhere that you can't knead wet doughs in the food processor so it's finger crossed until the AM!)

I'm already dreaming of what I will do with the price of the KitchenAid mixer I won't have to buy...