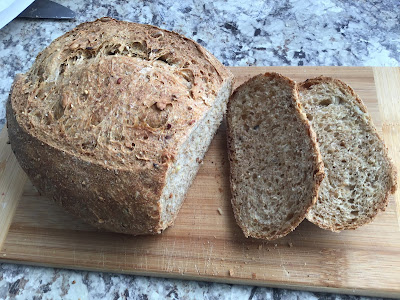
I thought I had finally figured it all out, then this week I had a contretemps, and it resulted in yet another positive development. (See Notes at the end.)
I hesitated a long time before publishing my recipe -- there is no copyright on recipes -- but at this stage of my life, I would be totally flattered if someone were to steal it! Please note that this is not a recipe for beginners.
THE MORNING BEFORE, make the POOLISH
170 g unbleached all-purpose flour
1/2 tsp instant yeast
Add
170 g water (cold, cool, lukewarm, makes no difference)
Mix well. Cover and leave at room temperature overnight. I leave mine 24 hours. Refrigerate after 24 hours if not ready to bake.
At the same time, prepare the SOAKER
130 g 12-grain cereal (I buy mine at Bulk Barn)
25 g raw sunflower seeds
1/4 tsp salt
220 g water (any temp., as above)
Mix and let stand at room temperature alongside the Poolish. I stir mine from time to time because the sunflower seeds tend to float on top. Probably makes no difference.
Refrigerate after 24 hours if not ready to bake.
FINAL DOUGH
Combine the Poolish with the Soaker and add
120 g water
3 TB canola or other plain oil
45 g sweetener (agave syrup, honey, malt syrup, molasses) - I prefer molasses (2.5 TB)
In a separate bowl:
500 g whole wheat all-purpose flour
2 tsp instant yeast
2.5 tsp ordinary salt
1. I combine the two mixtures, mix well with the hands, and set aside 30 minutes. (This 30-minute wait is what has changed my whole way of making bread. It takes the place of most of the kneading!)
2. Turn onto very lightly floured counter and knead a few minutes. I can tell when it's ready when the surface tension is such that the sunflower seeds start to pop out. It's that simple!
3. Shape into a ball and place in a big bowl. Cover and leave 45 minutes. (Please see my note at the end about this.)
4. Turn out of bowl, give one full turn (pull one side and fold it in half, give a quarter turn and repeat, do this twice more) and immediately shape into 3 equal size balls (I use my scale for this), place them on parchment paper, cover with plastic and let them relax for 5 minutes. (If you don't know how to shape dough into balls, google it, just don't make them tight as the actual shaping will take place after the 5-minute wait.)
5. Prepare your couche. (If in doubt, see my Ciabatta post [https://the-cooks-corner-blog.blogspot.com/2018/10/the-best-and-lightest-ciabatta-bread.html], except the flour needs to be all over the linen, and not so thick.)
6. Shape into three bâtards (look it up if need be) and place in couche, close together but separated by a fold of linen. Cover with leftover couche and plastic.
7. Turn on oven at 450 F with baking stone on the middle shelf. Fill a spray bottle with water.
8. When the loaves are sufficiently puffed - not doubled in size, just nice and puffy - transfer them to a sheet of parchment placed on a peel by flipping them upside-down (gently!).
9. Slash them - I like one long slash, and I use a regular knife sharpened on the steel just before.
10. Slip onto stone and spray (I do 20 pumps of my small spray bottle). Repeat every minute - 3 times in all then turn oven down to 425 F.
11. Bake 20 minutes, turn all the loaves around and bake until nice and brown with an internal temperature of at least 200 degrees F.
12. Cool on a rack. If you can wait until the loaves are cool before tasting, you will be rewarded!
NOTES
A. If baking in bread pans, you don't need the stone, and you don't spray with water. Also you could reduce the oven temperature.
B. Of course you can make small rolls, long baguettes etc. Try it!
C. With reference to No. 3 above, I had an interesting experience today. The loaves in the photo are the result of it. I was planning on baking the loaves yesterday, but I had to go out so the Poolish and Soaker ended up on the kitchen counter all day, which I felt was long enough so instead of refrigerating them again I put the dough together up to No. 3 and put the whole thing in the fridge overnight. When I got up, the dough had filled the huge bowl and I was a bit worried about that extra rise. However, I proceeded as per No. 4 and, well, the result is these two photos. What you can't see is how light this bread is considering that it is mostly whole grains -- I may end up doing this every time!
D. I keep forgetting to slash a bit off the centre, so I mostly get loaves that are a bit lopsided, like the ones above.


No comments:
Post a Comment