Tuesday

The Best Multigrain Bread, Made Entirely By Hand


The previous post (https://the-cooks-corner-blog.blogspot.com/2019/06/100-grain-multigrain-sandwich-loaf-by.html) is a couple of years old, and during that time I have been working on perfecting my multigrain bread recipe. I wanted to achieve a result that tasted great, of course, but it had to use the ingredients that I have easy access to and that uses the equipment I have - or rather the lack of it.

I thought I had finally figured it all out, then this week I had a contretemps, and it resulted in yet another positive development. (See Notes at the end.)

I hesitated a long time before publishing my recipe -- there is no copyright on recipes -- but at this stage of my life, I would be totally flattered if someone were to steal it! Please note that this is not a recipe for beginners.

THE MORNING BEFORE, make the POOLISH

170 g unbleached all-purpose flour
1/2 tsp instant yeast

Add
170 g water (cold, cool, lukewarm, makes no difference)

Mix well. Cover and leave at room temperature overnight. I leave mine 24 hours. Refrigerate after 24 hours if not ready to bake.

At the same time, prepare the SOAKER

130 g 12-grain cereal (I buy mine at Bulk Barn)
25 g raw sunflower seeds
1/4 tsp salt
220 g water (any temp., as above)

Mix and let stand at room temperature alongside the Poolish. I stir mine from time to time because the sunflower seeds tend to float on top. Probably makes no difference.

Refrigerate after 24 hours if not ready to bake.

FINAL DOUGH

Combine the Poolish with the Soaker and add

120 g water
3 TB canola or other plain oil
45 g sweetener (agave syrup, honey, malt syrup, molasses) - I prefer molasses (2.5 TB)

In a separate bowl:

500 g whole wheat all-purpose flour
2 tsp instant yeast
2.5 tsp ordinary salt

1. I combine the two mixtures, mix well with the hands, and set aside 30 minutes. (This 30-minute wait is what has changed my whole way of making bread. It takes the place of most of the kneading!)
2. Turn onto very lightly floured counter and knead a few minutes. I can tell when it's ready when the surface tension is such that the sunflower seeds start to pop out. It's that simple!
3. Shape into a ball and place in a big bowl. Cover and leave 45 minutes. (Please see my note at the end about this.)
4. Turn out of bowl, give one full turn (pull one side and fold it in half, give a quarter turn and repeat, do this twice more) and immediately shape into 3 equal size balls (I use my scale for this), place them on parchment paper, cover with plastic and let them relax for 5 minutes. (If you don't know how to shape dough into balls, google it, just don't make them tight as the actual shaping will take place after the 5-minute wait.)
5. Prepare your couche. (If in doubt, see my Ciabatta post [https://the-cooks-corner-blog.blogspot.com/2018/10/the-best-and-lightest-ciabatta-bread.html], except the flour needs to be all over the linen, and not so thick.)
6. Shape into three bâtards (look it up if need be) and place in couche, close together but separated by a fold of linen. Cover with leftover couche and plastic.
7. Turn on oven at 450 F with baking stone on the middle shelf. Fill a spray bottle with water.
8. When the loaves are sufficiently puffed - not doubled in size, just nice and puffy - transfer them to a sheet of parchment placed on a peel by flipping them upside-down (gently!).
9. Slash them - I like one long slash, and I use a regular knife sharpened on the steel just before.
10. Slip onto stone and spray (I do 20 pumps of my small spray bottle). Repeat every minute - 3 times in all then turn oven down to 425 F.
11. Bake 20 minutes, turn all the loaves around and bake until nice and brown with an internal temperature of at least 200 degrees F.
12. Cool on a rack. If you can wait until the loaves are cool before tasting, you will be rewarded!

NOTES
A. If baking in bread pans, you don't need the stone, and you don't spray with water. Also you could reduce the oven temperature.
B. Of course you can make small rolls, long baguettes etc. Try it!
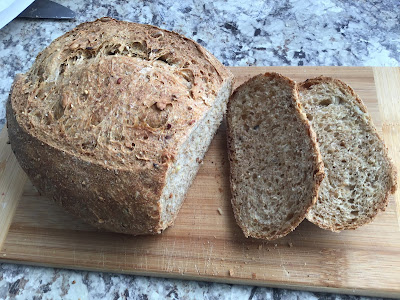
C. With reference to No. 3 above, I had an interesting experience today. The loaves in the photo are the result of it. I was planning on baking the loaves yesterday, but I had to go out so the Poolish and Soaker ended up on the kitchen counter all day, which I felt was long enough so instead of refrigerating them again I put the dough together up to No. 3 and put the whole thing in the fridge overnight. When I got up, the dough had filled the huge bowl and I was a bit worried about that extra rise. However, I proceeded as per No. 4 and, well, the result is these two photos. What you can't see is how light this bread is considering that it is mostly whole grains -- I may end up doing this every time!
D. I keep forgetting to slash a bit off the centre, so I mostly get loaves that are a bit lopsided, like the ones above.



Sunday

100% Grain Multigrain Sandwich Loaf By Hand? You Bet!

After that sad second experiment with the food processor last week - where cleaning time sort of cancelled out the time saved in kneading, and watching Michael Kalanty's course on Craftsy/Bluprint - and after my happy result making ciabatta rolls by hand, I decided to tackle the Serious Eats recipe I had made last week. Apart from the mess, it was a success and the recipe is one that you can start and finish on the same day.

This is what's left of it:

Serious Eats recipe made in food processor

The author, Stella Parks, warns that no other method but the food processor will produce the right results with her recipe, but I was willing to waste a pound of flour and half a cup of grains to test her theory. And I would get further practise in the art of breadmaking à l'ancienne.

I made the same substitutions to the recipe as I did last week - using 12-grain cereal from Bulk Barn instead of the individual grains on her list. Rested grains and flour for 2.5 hours after adding water to them.

That's when I veered away from the recipe. First I mixed the additional liquid, the yeast, sugar and oil together in a large bowl, added them to the wet flour by squishing them between the fingers à la Michael Kalanty. Then I added the salt and the soaked grains and continued squishing and mixing inside the bowl (wetting the fingers now and then) until all was blended, then I turned the dough onto the wet counter and did some slapping and smearing for a while.

I put the dough back in the bowl and let it rest about 20 minutes, then I gave it two turns, every 20 minutes or so, at which point I gave it the windowpane test and... surprise, it passed!

Back in the bowl for the required two hours. Shaped into a loaf and set the timer for 30 minutes and went away. When the timer went off, to my surprise the dough had already over-risen and the oven was still not on... and that's why the dome collapsed - as is obvious in the photo - but otherwise I would say the experiment was a success - wouldn't you?

Serious Eats recipe made entirely by hand
This bread is good and it works well as a sandwich loaf. But I need a deeper flavour, so next I need to tackle a slightly more complex loaf - one made with a poolish that has been fermenting overnight.

Stay tuned!

Friday

Ciabatta By Hand? Yes!

If and until I replace my KitchenAid mixer and/or spring for a better food processor, I'm pretty well stuck making bread by hand and today I made this batch of my own ciabatta recipe and frankly I can't tell the difference.


I used the method proposed by Michael Kalanty in the Craftsy class that I purchased years ago before they changed their name to Bluprint and made you subscribe instead of selling individual courses. (Luckily I had quite a few in my library and they're there "forever" for me to go back to.)

The class I'm referring to is "Secrets of Whole Grain Bread Baking" - nothing to do with white ciabatta, but bread is bread! I learned a lot from Mr. Kalanty, and it is mostly this: don't be afraid to handle your dough - even if it's super wet like this ciabatta!

Basically you mix your poolish and leave it overnight (check!), then you add the water and the flour and mix by hand (check!), then you rest and "develop" (that's bakerspeak for "knead") by hand in two stages, a total of only six minutes.

I know this dough so well that I was able to feel when it was ready to set aside and then to split into rolls and then to bake, so I couldn't give details even if I wanted.

Next I will make his "Seeded bâtard" which is a 100% whole wheat with seeds (I'm using 10-grain cereal instead because that's what I have and I'm adding extra sunflower seeds). I will make it freeform the first time (or in my oval banneton), but what I'd really like would be a sandwich bread baked in a pan that I could make regularly as my more healthy bread. At least until I can find a source of grains with reasonable prices so that I can start baking that wonderful Danish rye bread I posted here last year. I miss it so much!


Sunday

Kneading Bread Dough in the Food Processor

Google this and you'll find all sorts of links, but the most important one -- based on Charles Van Over's recipe from his book Best Bread Ever -- has just been deleted. It's important because it describes the process very thoroughly.

When I sold my house last December and decided to move a thousand miles away, I got rid of all my aging appliances and my big KitchenAid mixer was one of them. (Talk about something keeping its value -- I advertised it for $250 and my inbox immediately filled with buyers!)

Before springing for a new one, I thought I'd try to make all my breads without it. First I wanted to try kneading in the food processor. The ciabatta is going to be my first experiment.

Meanwhile, to perfect the technique I made a loaf of the Van Over bread. I followed the recipe exactly. I won't publish it here -- I suspect the publisher complained about copyright infringement --, but I did order the book and even though it's out of print you can get a used copy very cheaply, or your Library may have it.

It's a very simple recipe, makes a decent bread with a nice open texture in spite of a mere 45 seconds of kneading. Here is my loaf:


I shaped it in my oval banneton.

It looks good but flavour-wise, I would certainly not describe it as the "best bread ever" as it lack the depth that I am accustomed to in my white breads. A sort of slightly sour taste, like a mild sourdough.

Also it didn't keep very well; it dried very quickly in spite of being stored in plastic.

But I'm still glad I ordered the book because there are other recipes in there that I might want to play with.

As for the ciabatta, the starter is bubbling nicely as I write this, and tomorrow I'll let you know how it worked out. (I read somewhere that you can't knead wet doughs in the food processor so it's finger crossed until the AM!)

I'm already dreaming of what I will do with the price of the KitchenAid mixer I won't have to buy...