Tuesday

More Wild Mushrooms

My best crop of wild mushrooms usually comes from the lawn of some friends who live about a 45-minute walk away, the perfect distance for a bit of exercise. I have their permission to pick any and all fungi from their property.

Usually, it's horse mushrooms. My favorites. Tasty, easy to identify, and given the right weather conditions, apt to grow to a phenomenal size. 

Like this.


I had just heard that they were selling their property, so this morning I headed over there to see if the latest rain had produced a crop. And indeed it had.

Fearful that some hired person might come and mow down my dinner, I picked all there was. Normally, I would have allowed them to grow a bit bigger. I'm greedy when it comes to horse mushrooms.


This is what I got.

Enough for a large, lovely frittata.

I gave the recipe for preparing and cooking wild mushrooms in this earlier post.

Monday

Wild Mushrooms

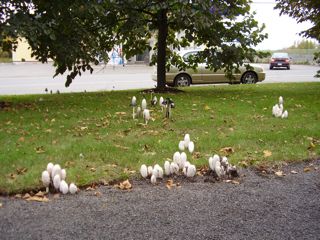
Shaggy Manes, also known as Inky Caps
I love this time of year. You're out for a walk, and suddenly you spot some white dots on the lawns and you know the wild mushrooms have arrived.

"Do you have a death wish?", asked a friend the other day when I wrote in Facebook that I had eaten some wild mushrooms that I had picked that day. She needn't worry: when I first moved here I asked around but nobody seemed to be eating the wild fungus so I did some research, bought a mushroom guide, and now I only pick varieties that I know are edible.

The mushrooms I pick are not the kind that grow in woods. Heaven knows we have plenty of forests around here, but they're rather impenetrable. I saw some chanterelles in a park in Fredericton once.

This is that day's crop, an assortment of white lawn mushrooms at various stages of maturity. As you can see, they are very close in appearance to the store-bought kind. My favourites are the bumpy ones; they are known as horse mushrooms. They are firmer and they can get as big as a dinner plate!

I ate them all, sprinkled over some fresh yellow beans.


HOW TO PREPARE AND COOK WILD MUSHROOMS

The main difference between these mushrooms and the cultivated kind is their water content. These edible delicacies appear after a good rain, and they're all pumped up with water. That makes it difficult to fry them, but to me that's the best way to bring out their flavor and I don't mind stirring while the extra liquid evaporates -- the aroma is worth the trouble!

I like to cook all my wild mushrooms the day I pick them, and keep them in the fridge, to be added to stews, sauces, soups, vegetables, and so on.

Preparation: Unless you cut them instead of pulling them, there's going to be a lot of dirt so the first thing I do is spread them out and cut off all the dirty ends.

Then I wash them in a large quantity of water. Of course they absorb more water that way but it's essential to give them a good washing -- the condition of the water afterwards confirms this. Besides, who knows if some mouse or other wild creature hasn't peed on them!

An old toothbrush is a good tool for scrubbing away the bits of dirt and grass.

The nice thing about this village is that nobody sprays their lawns, so I don't have to worry about getting rid of pesticides or herbicides. 

I drain them on several layers of paper towels over a wire rack, then wipe them dry before cooking them.

I separate them by color, i.e., the whiter ones (the ones whose gills haven't turned dark brown yet) in one pile and the the darker ones in another. I usually slice them all. Then I dab them with more paper towels, to get rid of more water.

Cooking: I warm some virgin olive oil and fry some sliced garlic until golden brown. I remove the garlic with a slotted spoon, then fry the mushrooms in batches until all the water evaporates and they begin to brown, adding salt, pepper and maybe some thyme. When they're done, I put the garlic back.

If I have enough horse mushrooms, I fry them separately because unlike most of the others, they are firm and dry -- very much like cultivated mushrooms -- and they brown more quickly.

Otherwise, I fry the white mushrooms first, then I start over with the oil and garlic for the dark ones.

The above is only for this type of mushrooms.

Inky caps or shaggy manes (coprinus comatus) (the kind in the first photo) are an October variety, so they weren't the ones mentioned in Facebook. They come back in the same spot every year -- a small park that is part of the Irving compound. (Irving is the company that owns all the oil and cuts all the trees around here.)

Here's a recipe for those, taken from Wild About Mushrooms: the Cookbook of the Mycological Society of San Francisco.  Check out their website

Shaggy Mane Quiche

Serves 6 as a first course
The shaggy mane is a favorite mushroom among mushroom-lovers. The caps liquefy rapidly, so speed is essential in getting them into the pot. One ardent admirer of this mushroom takes a skillet and butter on collecting trips so that the shaggy manes can be eaten where they are found.
  • 1/2 recipe pie crust
  • 5 to 6 bacon slices, cut into 1-inch pieces
  • 1/2 to 1 pound shaggy manes, sliced
  • 4 shallots or green onions, minced
  • 1/2 cup freshly grated provolone cheese
  • 1/8 teaspoon ground nutmeg
  • 1/4 teaspoon salt
  • Pinch of cayenne
  • 4 eggs, well beaten
  • 2 cups half and half
Prepare the pie crust. Roll the dough out to a 10-inch crust. Line a 9-inch pie pan with the crust. Crimp the edges.
In a sauté pan or skillet, fry the bacon until crisp, then remove it from the pan with a slotted spoon and drain on paper towels. Discard all but 2 tablespoons of the bacon fat and sauté the mushrooms and shallots until the shallots are translucent and most of the mushroom liquid has evaporated.
Spread the bacon over the pie crust. Add the grated cheese, then the mushroom and shallots. Mix the nutmeg, salt, and cayenne into the beaten eggs. Add the cream. Slowly pour the custard mixture over the bacon, cheese, and mushrooms.
Bake the quiche in a preheated 350º oven for about 35 minutes or until the custard is set and the top is brown.

NOTE: Shaggy manes and alcohol make a toxic combination.
 UPDATE: Since I wrote this post, I have obtained some further information about shaggy manes. Read it here.


WARNING! 

This article is not intended for use in identifying wild mushrooms. DO NOT EAT any wild mushrooms without consulting an expert.

MORE INFORMATION

There is a tremendous amount of information about wild mushrooms on the web, including recipes. There might even be a mycological society or association in your area.

Better yet, get a guide! Amazon.com is a good place to start.

Saturday

Who's In The Kitchen?

When I visit a cooking site or blog, I always want to know who's in the kitchen. Don't you?

For those who may have been wondering who's the cook in this Cook's Corner, I have begun to put together a bio, a detailed "About Me" page, as it were.

Stay tuned!


Monday

Readers' Questions 5

Q. Can I put allspice in my boeuf bourguignon? (From Peoria, Arizona, USA)

A. I think allspice is an excellent spice for beef -- in fact I use it my brown beef stock; it's a trick I learned in Mexico, where I had a superb beef stew in a canteen at a campground in Michoacan. Which goes to show that some of the best food may not be found where we think!


Q. Can you bake with homemade butter? (From Beltsville, Maryland, USA)

A. Absolutely! However, I would be wary of cooking (frying) with it unless I had washed all the milk out of it because it would burn very easily. Better yet, I would clarify it first. (But don't use clarified butter for baking.)


Q. What are the best accompaniments for beef bourguignon? (From Winnipeg, Manitoba, Canada)

A.  The classic accompaniments are mushrooms and small onions sautéed in butter, and small parsleyed boiled potatoes. Mashed potatoes are just fine and buttered noodles are Julia Child's favorite – and mine. Try them all!


Q. I would like Julia Child's recipe for crab cakes. (From Mableton, Georgia, USA)

A. I looked in all my Julia Child cookbooks and didn't find a recipe for crab cakes in any of them. That's not because the French don't eat them -- in fact it was at the Grand Véfour in Paris that I had the best crab cakes of my life.

If you'll settle for an American recipe, I have an excellent one from Cooks Illustrated. Click here for the PDF file.

Wednesday

Why Making Your Own French Baguette Is Empowering

No, this baguette is not from the bakery!
COOKING IS EMPOWERING because not knowing how to cook makes us dependent on Kraft and Lever Brothers and the other multinationals we allow to feed ourselves and our families.

I remember how I felt the first time I made my own baguette. Is there anything that seems more impossible to achieve than a real French baguette? Yet all you have to do is follow the recipe, learn from the first few failures, and soon you're making all your own bread, including French baguette.

I also remember the first time I tied my own roast. I was a successful restaurateur yet I depended on the butcher to tie my roasts for me. I would watch as he made a special knot that didn't require a helper to lend a finger to keep it from slipping.

One day I said, "Show me how to do this," and he did, and from then on I was able to make all sorts of elegant packages for my customers. Empowering.

(Curious about this butchers knot? Find out how to tie it here.)

Anyway, you ought to try your hand at making your own baguette. The folks at King Arthur Flour have a real easy and fully illustrated recipe on their blog, Baking Banter.

It's the recipe I used to make the loaf in these pictures, and if I may say so, mine turned out prettier than King Arthur's. (Talk about power!)

An Economical Chocolate Mousse Recipe


A READER from South Africa asks for an economical chocolate mousse recipe.

It's hard to know which of the usual chocolate mousse ingredients are expensive in other countries: Is it butter? Cream? Chocolate? Sugar? Eggs? Vanilla?

Is it the equipment?

It just so happens that my favorite chocolate mousse recipe (which is different from the one in my chocolate mousse cake – though you could certainly use it there) calls for no cream and no butter, and that's just about as economical as you can get, at least on this continent.

As far as equipment is concerned, if you don't have an electric mixer, a whisk will certainly do.

And not only that, but it's absolutely delicious, and it's the one I served in all my restaurants, in little pots. In my San Miguel de Allende (Mexico) restaurant, we used to put a surprise in the bottom – a chocolate-covered coffee bean, maybe, or a mint chocolate candy, or just a small chunk of chocolate. We also played with different liqueurs. Both the liqueur and the surprise changed every week.

Here is that chocolate mousse recipe:

For 5 or 6 small pots

4 or 5 very fresh eggs, at room temperature
1/2 cup plus 1 TB sugar (40 g)
6 squares (6 oz) semi-sweet or bittersweet chocolate (180 g)
3 TB strong coffee OR liqueur* OR brandy (45 ml)
1/2 tsp pure vanilla extract

MELT chocolate in top of double boiler; add coffee or booze, stir, add vanilla. Don't stir too much. Set aside to cool to room temperature.

SEPARATE the eggs, putting the yolks in the top of a double boiler or a bowl that fits over a pot with hot water in it. The whites go in a squeaky clean bowl, or in the mixer bowl, for whipping.

ADD the 1/2 cup of sugar to the yolks and beat until light and fluffy. Put over water (the bottom must not touch the water and if the water is boiling, take the pot off the heat). Leave for 3 or 4 minutes, or until lukewarm right through and the sides of the bowl are sticky. (I remember that the latter detail was added by my cook, after she'd made the mousse for several years, as a clue for apprentices.)

MOVE yolk-sugar mixture to an ice bath (a larger bowl with ice cubes and water in it), and stir until cool and thick.

ADD chocolate mixture to yolk mixture, stir well. Make sure it's cool before proceeding with the next step.

BEAT the egg whites until stiff, adding the 1 TB of sugar about halfway through.

STIR 1/4 of the egg whites into the chocolate mixture to loosen it, then gradually fold in the rest of the egg whites with a spatula, in 5 or 6 batches.

SPOON or pipe into individual pots or into one beautiful serving bowl.

SERVE decorated with a dot of whipped cream, an edible flower, a sprig of mint, a dusting of icing sugar – or nothing at all.

REFRIGERATE for at least 3 hours, and preferably overnight. 

ENJOY the compliments!

* Some of the liqueurs we have used include: coffee, orange, mint or chocolate; but a shot of very strong coffee works just as well.

CLICK HERE FOR THE PRINTABLE VERSION (PDF)

Monday

Readers' Questions 4

Q. My beef stock isn't brown. Why? (From South Yarra, Australia)

A. Did you brown the meat and vegetables enough, as specified in the recipe? Afterwards, did you scrape the brown bits at the bottom of the pan when you added the water? It's that caramelization that provides the brown color and the deep flavor to the stock.


Q. Do I stir the boeuf bourguignon in the stock pot?  (From San Francisco, California, USA)

A. In a word, No.


Q. Why don't you add salt to beef stock? (From Davenport, Iowa, USA)

A.  Because the stock reduces so much during cooking that it would end up too salty, or ruin the dish that you're adding it to.

This is a good place to apply the saying, "When in doubt, don't!"


Tuesday

Paupiettes de veau

THERE IS NO RECIPE for paupiettes de veau in Julia Child's Mastering the Art of French Cooking, but if there were, it would probably be this recipe, by her partner-in-crime Simone Beck, which the latter published in her own 1972 cookbook, Simca's Cuisine.

Right from the start, Simca's book became one of my favorites and I featured some of her recipes on my restaurants' menus. Her cooking is as delicate as the book's design and I'm sure that she's responsible for the light quality of many of the recipes in Mastering.

I don't make paupiettes de veau very often: veal prices are out of sight and if I go to the trouble of flattening a slice of pork, I'd rather make my famous crunchy wiener schnitzel with it (my two secrets: 1) dip scallops in seasoned flour, then egg, then breadcrumbs; and 2) deep-fry in fresh vegetable oil).

But here's Simone Beck's recipe for

Paupiettes de veau ou de porc à la tourangelle*
Recipe for Veal Paupiettes
(Small rolls of veal or pork stuffed with onions and cheese, in cream sauce)

For 6 (double the quantities for hearty appetites):

About 1/3 cup vegetable or peanut oil (80 ml)
About 5 medium-sized yellow onions (to make 2 cups, chopped)
6 veal or pork scallops, about 3 x 5 inches (7.5 x 12.5 cm), to be rolled
Salt
Black pepper
6 TB Dijon mustard
1 TB fresh oregano, minced (or 1 tsp, dried)
6 very thin slices imported Swiss cheese
4 TB butter
Bouquet garni of thyme, 1/2 bay leaf, oregano

1. WARM 2 or 3 tablespoons of the oil in a heavy-bottomed ovenproof skillet with a lid (large enough so paupiettes can cook in a single layer).

2. ADD the chopped onions, and cook them very gently, stirring occasionally, until they are tender and lightly colored (about 15 minutes). Remove them with a slotted spoon, set them aside, and season with salt and pepper. Do not clean the pan.

3. FLATTEN the veal or pork scallops between pieces of waxed paper [or plastic] with a mallet, a heavy bottle, the side of a cleaver, or a rolling pin, to make them as thin as possible. Sprinkle them with salt and pepper.

4. BRUSH each scallop with mustard and sprinkle lightly with oregano. Reserving 1 cup of onions for later, spread each scallop with a thin layer of onions and cover with a slice of cheese. Roll up the scallops into paupiettes and secure them with toothpicks or tie with string**. (It's easier to brown them if you use string.)

5. PREHEAT the oven to 350 F (180).

6. PUT THE paupiettes into the pan in which the onions were cooked, adding more oil if necessary, and brown them on all sides over moderate heat (about 15 minutes). Remove the meat to a plate and clean the skillet.

7. MELT the butter in the skillet, and add the meat, the remaining onions, and the bouquet garni. Cover with a piece of waxed paper***, put the lid on the skillet, and set it in the preheated oven. Cook 35 to 40 minutes for veal; about 45 minutes to 1 hour for pork, according to the tenderness of the meat. The meat will be done when it is easily pierced with a sharp knife.

Put the paupiettes on a warmed serving dish, discarding the strings or toothpicks. Spread the onions around the meat and keep the platter warm while making the sauce.

Sauce

2 TB flour
1/4 to 1/3 cup heavy cream (60 to 120 ml)
Juice of 1 medium-sized lemon, strained
1 cup beef bouillon, fresh or canned (250 ml)
Salt, freshly ground black pepper
Chopped parsley

1. PUT the flour in a small saucepan and gradually stir in the cream to make a smooth paste. Stir in the strained juice of the lemon and set aside.

2. POUR the bouillon into the skillet in which the meat was cooked, and set over heat. Let boil half a minute, scraping the bottom to deglaze. Pour 4 or 5 TB of the bouillon into the flour mixture and mix well; then pour back into the skillet and simmer, stirring constantly, while the sauce thickens. Taste, and correct the seasoning.

Serving

Cover the paupiettes with the sauce and serve them sprinkled with chopped parsley.

Variation

Omit the mustard and replace the Swiss cheese with goat cheese.

Paupiettes de veau in the slow cooker?

Why bother? What takes a long time with paupiettes is the preparation and you can't skip that part, plus the sauce has to be made separately.

Those lucky French women!

If you were living in France, or even in Montreal or Québec City, you could stop by the butcher shop on your way home from work and pick up some nice pre-flattened and pre-trimmed scallops, along with some sausage meat ready to turn into stuffing, or you could buy pre-stuffed and tied paupiettes, ready to cook, or even some fully cooked and sauced paupiettes de veau, ready to reheat.

Then you could go next door and pick up some fresh noodles and a nice salad, and by the time you'd had your apéritif and appetizer, dinner would be ready!


* A la tourangelle means "from the Touraine", that beautiful region of France that is celebrated for its many châteaux.

** This is what they should look like after tying:


*** Nowadays we'd use foil or parchment paper

CLICK HERE FOR PRINTABLE VERSION (PDF)

Wednesday

A Perfect Mexican Tortilla... in New Brunswick

REMEMBER my Christmas wish? Thanks to my brother's generosity, I have been able to satisfy my craving for the occasional Mexican tortilla or two, or three, to go with some of my Mexican specialties.

Listen, I won't pretend that tortillas made with this dried flour are comparable in quality with the home-made tortillas that every Mexican prefers to eat at home, even though nowadays they're more likely to buy inferior tortillas from the neighborhood tortillería (tortilla factory) because, like us, they just don't have the time. In Mexico, if you can afford it, you can always buy still-warm home-made tortillas at the local market, where many women go to earn a few extra pesos by selling the tortillas that they make at home from scratch.

So, I've been practicing my tortilla-making art, aiming for the perfect tortilla (perfect within these limitations, I mean), which is the result of the ideal combination of just the right amount of moisture in the dough, the right kind of comal or frying pan at just the right temperature, the right thickness, the right timing, and so on. If all those conditions are met, you get a tortilla that puffs up like this:


The other day, spurred by my success at the tortilla press, I made another of my favorite Mexican things: pickled jalapeño peppers. I always use Diana Kennedy's recipe straight out of The Essential Cuisines of Mexico, it's so perfect.

Need I warn you, dear reader, that those peppers are hot? (And so are the carrots, by the way.)

It goes like this:

Chiles Serranos o Jalapeños en Escabeche
(Pickled Serrano or Jalapeño Chiles)

Makes 6 half pints (1.5 litres) -- (I made half the recipe)

1 1/2 lbs (675 g) serrano or jalapeño chiles, left whole or cut into quarters lengthwise
3/4 cup (185 ml) vegetable oil (I used virgin olive oil)
2 medium white or yellow onions, thickly sliced
3 medium carrots, scraped and thinly sliced
1 head garlic, cloves separated but not peeled
3 cups (750 ml) mild vinegar (plain old white vinegar)
2 TB salt
2 bay leaves (Mexican if possible)
1/2 tsp dried oregano (Mexican if possible)
6 sprigs fresh marjoram or 1/2 tsp dried
6 sprigs fresh thyme or 1/2 tsp dried
1 TB sugar

1. WASH the chiles, leaving the stems intact. Cut a cross in the tip end of each chile so the vinegar can penetrate.

2. HEAT the oil in a large, deep skillet, then add the chiles, onions, carrots and garlic, and fry over medium heat for about 10 minutes, turning from time to time.

3. ADD the vinegar, salt, herbs and sugar, and bring to a boil. Lower heat and simmer for 5 minutes for serranos and 10 minutes for jalapeños.

6. PACK 6 sterilized half-pint jars with the chiles, vegetables, and herbs; top with the vinegar and seal.

These should keep for about one month in the refrigerator.

Important Note: Partially cooked chiles allow the growth of bacteria, so it's important to make sure that the chiles have been cooked thoroughly if they are to be kept for any length of time. (I prefer to make them more often.)

Tuesday

Some of my Favorite Cocoa Recipes

 
BACK IN THE 70's when I had my first restaurant, one of the desserts we served at lunch was a hot fudge sundae. We never wrote down the recipe because the delicious hot fudge sauce recipe was printed on the Fry's cocoa box. 

Eventually, Fry's changed the cocoa recipes on the box, and so the other day when I looked it wasn't there. I'm testing some ice cream recipes these days, and I wanted that hot fudge sauce recipe, so I went online, and I checked all my cookbooks, but none of the recipes resembled that one, whose ingredients were simply cocoa, sugar, water, butter and vanilla – that much I did remember.

I occurred to me to write the manufacturer and request that recipe, along with the one for chocolate syrup that also appeared on the box, back then, and Cadbury's answer came today. And there they were!

Here are those two Fry's cocoa recipes, just for you. (I have added the proportions for making hot and cold chocolate milk at the end; they are straight off the Fry's Cocoa box -- the 2010 version.)

HOT FUDGE SAUCE

Serve over ice cream, preferably combined with marshmallow sauce for a divine hot fudge and marshmallow sundae, one of the world's great culinary inventions!

1 1/3 cups sugar    
1 cup  cocoa powder
1 cup  water   
1 cup  butter     
2 tsp vanilla    

Combine sugar and cocoa in medium saucepan. Stir in water. Cook and stir over medium heat until mixture comes to a boil. Reduce heat and boil gently 5 minutes. Remove from heat. Stir in butter and vanilla. Cool. Makes about 2 2/3 cups.

Variation: To each  cup of cooked sauce stir in 2 TB of your favourite liqueur.

Microwave Method: Combine sugar and cocoa in 4-quart  microwave-safe bowl. Stir in water. Microwave, uncovered, at HIGH (100%) 4 ½ to 5 minutes or until mixture comes to a boil. Stir 3 times while cooking. Microwave, uncovered, at MEDIUM (50%) 3 to 4 minutes longer. Stir twice while cooking. Stir in butter and vanilla. Cool.

Gina's Comment: If the butter was unsalted, I would add a good pinch of salt, maybe as much as 1/4 teaspoon.


CHOCOLATE SYRUP

Keep lots of this versatile syrup on hand to use in hot and cold drinks and other desserts. It’s the homemade alternative to the bottled stuff from the supermarket - but oh so much more natural.

2 ½ cups sugar
1 ½ cups cocoa powder
2 cups water
2 tsp vanilla

Combine sugar and cocoa in large saucepan. Gradually stir in water. Cook and stir over medium heat until mixture comes to a boil. Reduce heat and boil gently 5 minutes; stir occasionally. Cool. Add vanilla. Cover and store in refrigerator. Makes about 3 ½ cups.

Microwave Method: Combine sugar and cocoa in 4-qt microwave-safe bowl. Gradually stir in water. Microwave, uncovered, at HIGH (100%) 8 to 9 minutes or until mixture comes to a boil. Stir 3 times while cooking. Microwave, uncovered, at MEDIUM (50%) 4 to 5 minutes. Stir twice while cooking. Proceed as above.

Storing: Transfer it to one of those plastic ketchup or mustard squeeze bottles.

Serving:  For cold or hot chocolate, just stir some into cold or hot milk until it's just the way you like it. Or use as a chocolate sauce over ice cream, pancakes, etc. Shake before using.

Gina's Comment: Here too I would add about 1/4 teaspoon of salt.


HOT COCOA (Hot Chocolate)

Blend 1 tablespoon cocoa powder with 2 tablespoons of sugar.

Mix in 1 tablespoon of cold milk until you get a smooth paste.

Stir in 1 cup (250 ml) of hot milk.

Top with whipped cream or mini marshmallows (optional); and/or

Sprinkle with cinnamon or cocoa powder if desired.

TIP: To get a nice foam on top, whisk in the hot milk or use an immersion blender instead of just stirring.


CHOCOLATE MILK (cold)

Make it in exactly the same way as the hot chocolate.

I like to add some ice cubes.